|
To
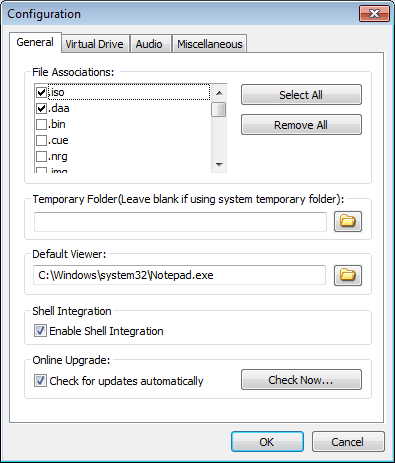
view or change PowerISO settings, please click the menu item, "Options
--> Configurations". There are four tabs in
"Configuration" dialog.
File
Associations: If the file extension is associated with PowerISO, you
can open it by double-clicking on the file.
Temporary
Folder: When PowerISO extract image file to temporary folder, it will
use the folder specified here. If not specified, PowerISO will use system
temporary folder instead.
Default
Viewer: The default viewer will be used when you click the menu item,
"View with default viewer...". By default, Windows notepad
application will be used.
Enable
Shell Integration: If this option is set, you can manipulate image
files in "My Computer" by using the shell context menu.
Check
for updates automatically: If this option is set, you will received a
notification when a new version of PowerISO is available. You may then
decider whether to install the updates or not.

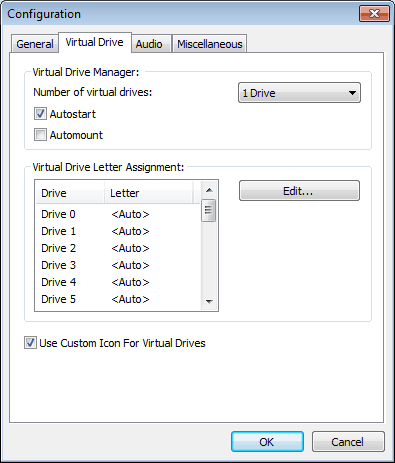
Number
of Virtual Drives: Here you can the number of virtual drives. The
default number of virtual drives is 1. However, PowerISO supports up to 23
virtual drives.
Auotostart:
PowerISO Virtual Drive Manager will run on system startup.
Automount:PowerISO
will automatically mount selected image file on startup.
Virtual
Drive Letter Assignment: By default, PowerISO will use the first
available drive letter for the virtual drive. However, you may also choose
a difference letter for the virtual drive. If you would like change the
drive letter, please select the virtual drive from the list, then click
"Edit..." to assign a new letter for the drive.
Use
Custom Icons for Virtual Drives: If this option is set, the virtual
drive icon will be replaced with PowerISO virtual drive icon, so that you
can distinguish which drive is the virtual drive created by PowerISO.

-
Settings
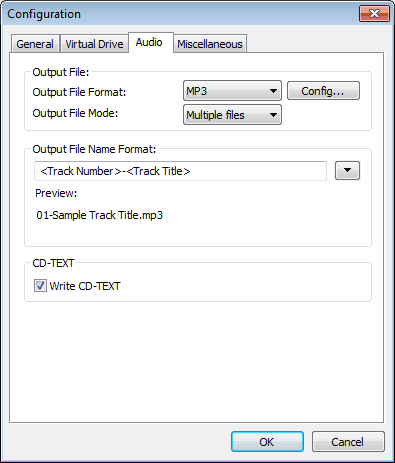
in "Audio" Tab:
Output
File Format: The output format can be mp3, flac, ape, wma, or wav.
To change the encoding settings, please click "Config..."
button.
Output
File Mode: The output mode can be "multiple files" or
"single file". For "multiple files", PowerISO will
rip each track to a separate music file. For "single track",
all tracks will be ripped to a single file.
Output
File Name Format: Specify the output file name for ripping. You can
click down arrow button to change the settings.
Write
CD-TEXT: If this option is set, the CD-TEXT information will be
written when burning an Audio CD.

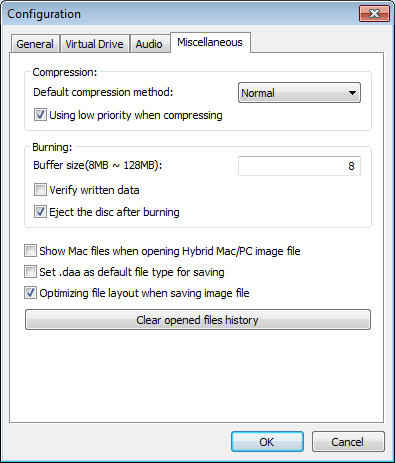
Default
compression method: Set the default compression method when creating
daa file.
Using
low priority when compressing: If this option is set, PowerISO will
automatically set the compressing thread to low priority, so that it will
not slow down the computer's response.
Burning
Buffer size: Specify the burning buffer size. The value must be
between 8MB and 128MB.
Verify
written data: If this option is set, PowerISO will compare the written
data with original copy when burning to make sure the data was burned
correctly.
Eject
disc after burning: If this option is set, the disc will be ejected
after burning.
Show
Mac files when opening Hybrid Mac/PC image file: If this option is
set, the Mac partition will be shown when opening a Hybrid Mac/PC image
file, otherwise, the PC partition will be shown.
Set
.daa as default file type for saving: If this option is set, the
default file type for saving is daa file, otherwise, the default file type
is ISO.
Optimizing
file layout when saving image file: If this option is set, PowerISO
will optimize file layout to make sure identical files will only occupy
space once. This can reduce file size, but may take long time for
optimizing.
Clear
opened files history: Click this button to clear opened files history
if you don't want recently opened files to be listed in "Recent
Files" menu.

|


